If you’ve ever held a knobby little dahlia tuber in your hand and wondered, What on earth do I do with this? you’re not alone. I still remember my first season with dahlias i was overwhelmed, unsure and staring at a pile of strange, root-like things that didn’t look like flowers at all.
But oh, when they bloomed! It felt like magic. Those vivid, layered petals each one more perfect than the last made every step of learning worthwhile. If you’re dreaming of a backyard full of bold, beautiful dahlias, I’m here to walk you through every step. With the right start, you’ll be harvesting armfuls of blooms before you know it. Let’s dig in literally
What Are Dahlia Tubers?

Dahlia tubers are the underground storage structures that help the plant survive through dormant periods and spring back to life each growing season. They’re thick, potato-like roots that store energy and moisture until it’s time to grow again. Unlike seeds, which require a longer growing process, tubers give you a head start helping you grow big, healthy plants faster.
Many beginner gardeners confuse tubers with bulbs, but understanding the difference will help you plant them properly and avoid common mistakes.
Dahlia Tubers vs. Bulbs – What’s the Difference?
This is a question I get all the time and it’s an important one. Dahlias grow from tubers, not true bulbs and that means their planting needs are a little different.
| Feature | Dahlia Tubers | Flower Bulbs (e.g., Tulips, Daffodils) |
|---|---|---|
| Structure | Fleshy, irregular, root-like masses | Compact, round bulb with a central shoot |
| Storage Function | Store water and nutrients | Store entire embryo and food source |
| Dormant Care Needed | Must be dug up and stored in winter | Can often be left in ground (climate-dependent) |
| Planting Orientation | Neck and eyes should face up | Pointed side up |
When planting dahlias, you don’t bury them deep like bulbs. Instead, they’re placed shallowly in well-drained soil with the “eye” facing up. Treating tubers like bulbs is a fast way to rot them trust me, I learned that the hard way.
Understanding the Parts of a Dahlia Tuber
A dahlia tuber isn’t just one big root it’s made up of several parts and each plays a role in the plant’s success:
- Neck: The narrow connection point between the tuber and the stem. This is where new growth will emerge.
- Eye: A small bud at the top of the neck. This is the growing point no eye, no plant!
- Body: The fat, swollen part that stores nutrients and moisture.
- Stem Remnant: Often visible from last year’s plant, this helps you orient the tuber correctly.
When purchasing or dividing tubers, always look for the eye without it the tuber won’t grow. I once bought a bag of discount tubers without checking. They were plump and pretty, but eyeless. Not one grew. Lesson learned!
When and Where to Plant Dahlia Tubers
Knowing when and where to plant dahlia tubers is one of the most important steps to growing vibrant, healthy dahlias. The timing and location set the stage for strong roots, lush foliage and abundant blooms. I’ve had gardens flourish or struggle just based on these choices so I’ll share everything I’ve learned to help your dahlias thrive.
Best Time to Plant Dahlias for Optimal Growth
Dahlias are sensitive to cold soil and frost, so timing is everything. The best time to plant your dahlia tubers is after the last frost date in your area, when the soil temperature warms up to about 60°F (15°C). For most U.S. gardeners, this means planting in late April to early June depending on your zone.
If you plant too early, cold soil can cause the tubers to rot before they sprout. Too late, and you risk a shorter growing season with fewer flowers.
Here’s a quick timeline I follow every year:
- Check your local last frost date using a gardening calendar or online resource.
- Prepare your garden bed a week before planting.
- Plant tubers on a warm, calm day for best results.
Waiting can be hard totally get it but patience pays off in dahlias.
Choosing the Perfect Spot – Sunlight, Soil, and Drainage Tips

Location can make or break your dahlia patch. Here’s what you want to look for:
- Full Sun: Dahlias are sun lovers and need at least 6-8 hours of direct sunlight daily. The more sun, the bigger and brighter your blooms.
- Well-Drained Soil: Tubers hate soggy ground. Poor drainage leads to rot faster than you can say “dahlia disaster.” Raised beds or amended soil are great solutions.
- Sheltered from Wind: Tall dahlias can snap in strong wind. Choose a spot shielded by a fence or hedge to protect your plants.
I learned this the hard way my first year planted in a shady corner and half my dahlias never flowered. Now I prioritize sun and drainage above all.
How to Prepare Your Soil for Dahlias
Preparing your soil well is like laying a strong foundation for a beautiful home your dahlias will thank you with robust growth and stunning flowers. Good soil preparation improves drainage, provides essential nutrients and creates the perfect environment for tubers to develop strong roots.
Soil Amendments and Fertilizers for Strong Starts
Dahlias love rich, loamy soil with plenty of organic matter. Before planting, I always mix in compost or well-rotted manure to boost fertility and soil texture. This not only feeds the plants but also helps retain moisture without waterlogging the tubers.
Here are some key tips for soil amendments:
- Use compost or aged manure to improve nutrient content.
- Add a balanced slow-release fertilizer with equal parts nitrogen, phosphorus, and potassium.
- Avoid too much nitrogen it encourages leaves but fewer flowers.
- Test your soil pH; dahlias prefer slightly acidic to neutral soil (pH 6.0 to 7.0).
Applying these amendments about two weeks before planting gives the soil time to settle and nutrients to become available.
Spacing and Bed Preparation Tips
Spacing your dahlias properly ensures good air circulation, which helps prevent disease and encourages bigger blooms. Here’s how I space and prepare my beds:
- Plant tubers 12 to 18 inches apart, depending on the dahlia variety size.
- Beds should be loosened to a depth of at least 12 inches to help roots spread easily.
- Remove weeds and debris before planting to reduce competition.
- Add a thin layer of mulch after planting to retain moisture and suppress weeds.
By giving your dahlias enough room and a well-prepared bed, you set them up for a flourishing growing season.
Step-by-Step Guide to Planting Dahlia Tubers
Planting dahlia tubers may seem tricky at first, but once you know the right steps, it becomes a joyful ritual. I still get excited every spring when I tuck those little tubers into the soil, imagining the explosion of color to come. Follow along with me and you’ll be planting like a pro in no time.
How Deep to Plant Dahlia Tubers
Dahlias should be planted shallowly to protect tubers from rot while giving roots space to grow. The general rule I follow is:
- Plant tubers about 4 to 6 inches deep in the soil.
- Cover lightly with soil first, then fill in the rest after sprouts appear.
Planting too deep can suffocate tubers, while too shallow leaves them vulnerable to drying out or frost.
Eye Placement and Orientation
Orientation matters! The “eye” or growing point must face upwards toward the surface. If you plant the tuber sideways or upside down, growth will be delayed or stunted.
Here’s a simple trick I use: the tuber looks a bit like a knobby root with one or two small bumps (eyes). Plant it so those bumps face skyward. If you’re unsure, plant horizontally with the neck slightly angled upward the plant will find its way.
Watering After Planting – Dos and Don’ts
Watering just after planting requires a gentle touch:
- Do water lightly to settle the soil but avoid soaking it.
- Don’t drench the soil, or you risk tuber rot.
- Wait until you see sprouts before watering deeply.
In my experience, overenthusiastic watering is one of the top reasons tubers fail early. Think of watering like giving a baby the right amount of milk not too little, not too much.
Caring for Your Growing Dahlias
Once your dahlias start sprouting, the real fun begins Watching them grow tall, putting out leaves and finally bursting into bloom is incredibly rewarding. Proper care helps your dahlias reach their full potential.
When and How to Water for Healthy Roots
Water your dahlias deeply once or twice a week, depending on rainfall. Early morning is the best time to water to reduce fungal risks.
- Focus on the base of the plant, not the foliage.
- Keep the soil moist but never soggy.
- Increase watering during hot, dry spells.
I’ve learned that consistent watering helps dahlias develop strong roots and big flowers, but soggy soil is a quick way to disaster.
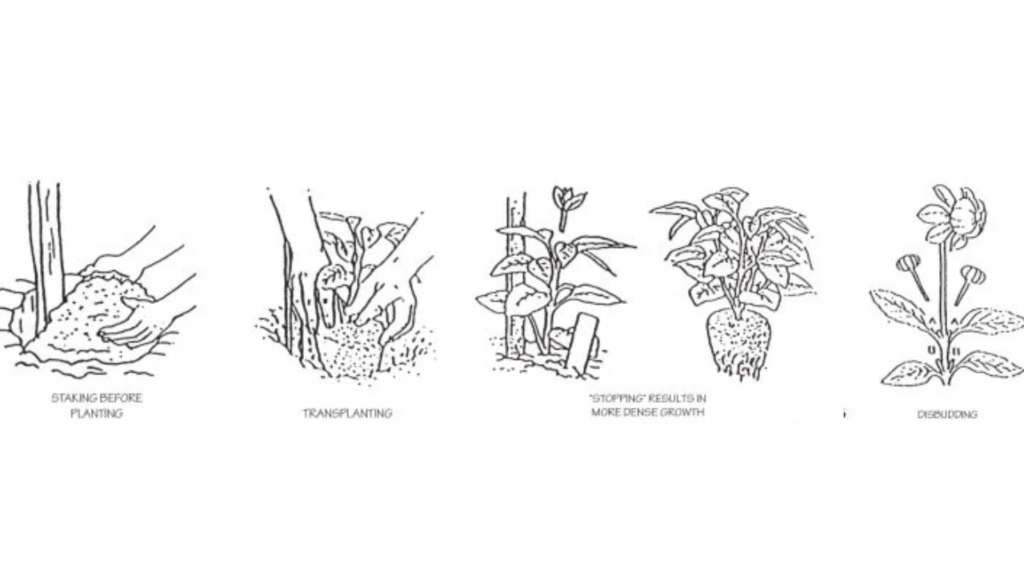
Staking and Supporting Tall Dahlia Varieties

Many dahlia varieties can grow over 4 feet tall and need support to prevent bending or breaking.
- Use stakes or cages to support stems.
- Insert stakes at planting time to avoid disturbing roots later.
- Tie stems loosely with soft garden ties or twine.
Without support, your dahlias can snap in wind or under the weight of heavy blooms something I wish I knew sooner
Pinching Dahlias – Why It’s Important
Pinching is removing the growing tip of young plants to encourage bushier growth and more blooms.
- Pinch back when plants reach about 12 inches tall.
- Remove the top 1-2 inches of growth.
- This redirects energy to side shoots.
Pinching doubled my flower yield in my first season and it’s a simple trick I always recommend to beginners.
Common Dahlia Planting Mistakes to Avoid

Gardening is full of learning moments and I’ve made my share of mistakes. Let me help you avoid these common pitfalls that often trip up new dahlia growers.
Overwatering or Planting Too Early
Planting tubers before the soil warms or watering excessively invites rot and fungal diseases.
- Wait for soil temps around 60°F (15°C).
- Water sparingly until sprouts appear.
- Use well-drained soil.
Tubers Not Sprouting – What Went Wrong?
If your tubers don’t sprout, it might be due to:
- Damaged or eyeless tubers.
- Planting too deep or upside down.
- Soil too cold or soggy.
Check your tubers carefully before planting and be patientthey can take 2-4 weeks to sprout.
What to Do If You Can’t Plant Right Away
Sometimes life gets busy, or the weather isn’t ready. Here’s how to keep your tubers safe until planting time.
How to Store Tubers Before Planting Time
Store tubers in a cool (50-60°F), dark, and dry place with good airflow.
- Keep them in peat moss, sawdust, or paper bags.
- Avoid plastic bags which trap moisture.
- Check regularly for signs of rot or shriveling.
Signs of Rot or Mold and How to Fix It
Rot looks like soft, mushy spots and mold appears as fuzzy growth.
- Remove any affected parts with a clean knife.
- Dust with fungicide or cinnamon as a natural alternative.
- Let tubers dry before storing again.
Early detection can save your tubers and your garden plans!
Bonus Tips for First-Time Dahlia Growers
Here are a couple of secrets I wish I knew when I started my dahlia journey.
Why Some Tubers Are Expensive – And Are They Worth It?
Premium tubers often come from award-winning or rare varieties, promising unique colors and larger blooms. While pricier, they can be worth it if you want to elevate your garden’s look or cut flower collection.
I started with cheaper tubers, but investing in quality varieties made a noticeable difference in bloom size and health.
How to Multiply Dahlias for Free Every Year
Once your dahlias are established, you can divide tubers every fall to grow new plants without buying more.
- Dig up tubers after the first frost.
- Gently separate them, ensuring each piece has an eye.
- Store and replant the next season.
This method saves money and lets you share your favorite dahlias with friends!
Final Thoughts: Starting Your Dahlia Garden with Confidence
Planting dahlia tubers may seem daunting at first, but with a little patience and care, you’ll be rewarded with breathtaking blooms season after season. Remember, every gardener makes mistakes, but each one is a step closer to growing flowers that brighten your home and heart. Trust yourself, enjoy the process, and know I’m rooting for you every step of the way.
FAQs
Q1: Can I plant dahlia tubers directly in pots instead of the ground?
Yes! Dahlias grow well in large pots with good drainage. Use a quality potting mix and make sure the pot is at least 12 inches deep.
Q2: How long does it take for dahlia tubers to sprout?
Typically, tubers sprout in 2 to 4 weeks after planting, depending on soil temperature and moisture.
Q3: What do I do if my tubers start sprouting indoors before planting?
If tubers sprout early indoors, plant them carefully outdoors when the soil warms up. Keep the sprouts protected and water moderately.