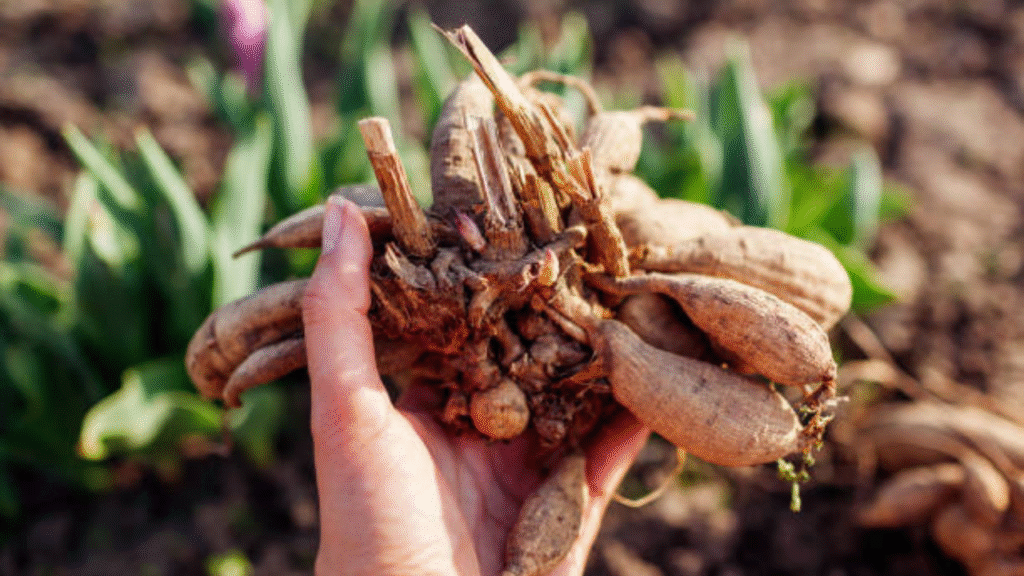
Starting a cut flower garden can feel overwhelming especially when you’re faced with strange-looking roots like dahlia tubers. I still remember the first time I held one in my hand knobby, a little wrinkled and honestly confusing. But with patience, a little guidance and a whole lot of love, those tubers transformed into some of the most breathtaking blooms I’d ever seen.
Growing dahlias taught me that sometimes the ugliest beginnings lead to the most beautiful rewards. I still laugh at how nervous I was to even bury that first tuber in the soil. But once you understand how they work, dahlias stop feeling intimidating and instead become one of the most rewarding flowers you can grow. In this guide, I’ll walk you through everything I’ve learned over the years so you can grow your own gorgeous dahlias, right from the tuber.
Understanding Dahlia Tubers: What They Are and How They Grow
What Is a Dahlia Tuber?
Dahlia tubers are swollen underground storage roots that resemble sweet potatoes. Each tuber stores energy and nutrients that help the plant sprout and grow. Unlike seeds, tubers are actual pieces of the parent plant and will produce clones of that plant when grown.
It helps to remember that a tuber is essentially the plant’s survival tool. Even when the top growth dies back, the tuber holds all the life energy needed for a comeback. This cycle of dormancy and rebirth is what makes dahlias such dependable perennials when cared for properly.
How Dahlia Tubers Develop and Store Energy
After planting, the tuber grows roots and sends up green shoots. As the plant matures, it uses the stored energy in the tuber to fuel rapid growth and blooming. At the end of the growing season, the tuber grows larger, storing even more nutrients for next year’s flowers.
Choosing the Right Dahlia Tubers for Planting
Another factor to consider is the variety. Decorative, cactus, pompom, and dinnerplate dahlias all produce tubers, but some varieties are more vigorous than others. If you’re a beginner, start with tried-and-true types like ‘Cafe au Lait’ or bright, sturdy pompom varieties which tend to sprout reliably and produce armloads of blooms.
Clumps vs Individual Tubers: Pros and Cons
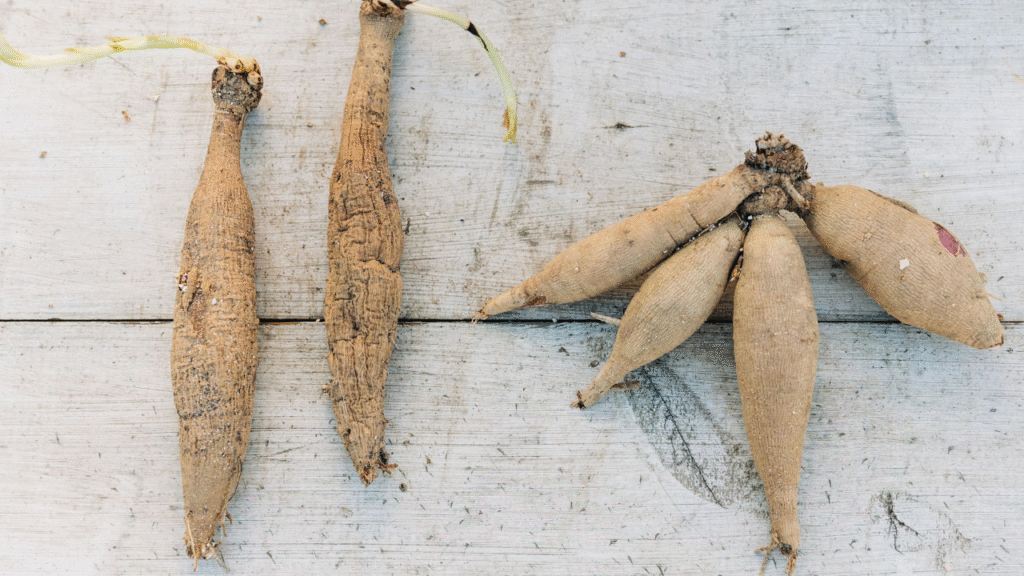
- Clumps: Usually include multiple tubers and a portion of the original stem or crown. They have more eyes (growth points), increasing your chances of successful sprouting.
- Individual Tubers: Easier to store and divide, but only viable if they include at least one visible eye.
Does Tuber Size Affect Growth and Bloom?

Size matters to an extent. Larger tubers often have more stored energy, leading to stronger initial growth. However, a small tuber with a healthy eye can still produce a thriving plant if cared for properly.
How to Identify Healthy Tubers
Look for tubers that are:
- Firm, not mushy or shriveled
- Free from mold or dark, soft spots
- Clearly marked with or showing a visible eye (a small bump or nub near the neck)
Preparing Dahlia Tubers for Planting
Some gardeners also dust their freshly cut tuber clumps with cinnamon or sulfur powder, both of which act as natural fungicides. This small step can go a long way in preventing rot during storage or early planting.
When and How to Split Dahlia Tubers

You can divide dahlia clumps in late winter or early spring, once the eyes have started to form. Use a clean knife to split the clump so that each section includes at least one tuber and one eye.
Tools and Techniques for Splitting Tubers Safely
- Sharp garden knife or pruners
- Clean, sanitized blade to avoid disease spread
- Gently rinse soil off before cutting
- Let the cut surfaces dry for 24 hours before planting
Inspecting Tubers for Disease or Damage
Before planting, inspect each tuber for signs of rot, mold or injury. Discard any that are soft or discolored. If you’re unsure, cut into the tuber slightly healthy tubers are white and firm inside.
Planting Dahlia Tubers: Step-by-Step Guide
If you live in a cooler climate, you can get a head start by potting tubers indoors a few weeks before your last frost. Place them in large pots with light soil, keep them in a sunny window or under grow lights and then transplant them outside once the weather warms. This jump-start often means earlier blooms in summer.

Ideal Soil and Location for Dahlia Tubers
Dahlias thrive in:
- Loose, well-draining soil
- Full sun (at least 6–8 hours daily)
- Enriched beds with compost or organic matter added
How Deep and Far Apart to Plant Tubers
- Plant tubers 4–6 inches deep
- Space them 18–24 inches apart
- Position the tuber horizontally with the eye facing up
Watering and Initial Care After Planting
After planting:
- Water lightly until shoots emerge
- Avoid overwatering to prevent rot
- Once sprouts appear, water deeply 2–3 times per week, depending on your climate
Common Problems with Dahlia Tubers and How to Avoid Them
Identifying and Preventing Tuber Rot

Tuber rot is often caused by soggy soil or poor drainage. Always plant in well-draining soil and avoid watering too frequently before shoots appear.
Signs of Dried-Out or Damaged Tubers
Tubers that are too dry may appear hollow or shriveled. Soak them in lukewarm water for 1–2 hours before planting if they feel too dry.
Protecting Tubers from Pests and Diseases
Use these tips:
- Dust tubers with sulfur powder before planting to deter fungal infections
- Rotate planting locations each year
- Watch for pests like slugs and earwigs
Caring for Dahlia Tubers Throughout the Growing Season
Supporting Healthy Growth and Flowering
- Stake tall varieties to support heavy blooms
- Deadhead regularly to encourage new flowers
- Feed monthly with a balanced flower fertilizer
When to Stop Watering and Prepare Tubers for Storage
Once frost blackens the foliage:
- Stop watering
- Let the plant rest for a few days
- Prepare to dig up the tubers for winter storage
Storing Dahlia Tubers for Next Season
How to Properly Dig Up and Clean Tubers
- Use a garden fork to lift tubers gently
- Shake off excess soil
- Rinse with water and let them dry in a cool, shaded area for 2–3 days
Best Practices for Storing Tubers Over Winter

| Storage Method | Temperature | Material | Notes |
|---|---|---|---|
| Cardboard box | 40–50°F | Peat moss or sawdust | Keep in dark, dry location |
| Paper bag | 40–50°F | Vermiculite | Avoid plastic—it traps moisture |
Checking Tubers Before Replanting
In early spring:
- Inspect tubers for firmness and eyes
- Remove any rot or shriveled parts
- Rehydrate slightly if they seem too dry
Conclusion
Growing dahlias from tubers may seem intimidating at first, but with the right care, patience, and attention, these knobby roots reward you with stunning, long-lasting blooms year after year. By choosing healthy tubers, planting them correctly, nurturing them through the season, and storing them properly for winter, you can enjoy vibrant dahlias season after season.
Frequently Asked Questions About Dahlia Tubers
Q1: Can I grow dahlias from seeds instead of tubers?
Yes, but tubers are preferred for consistent flower type and faster blooming.
Q2: How long do dahlia tubers last in storage?
If stored properly, they can last through winter and be replanted for several years.
Q3: Do I need to dig up my dahlias every year?
In colder climates (Zones 7 and below), yes. In warmer zones, you can leave them in the ground with mulch protection.